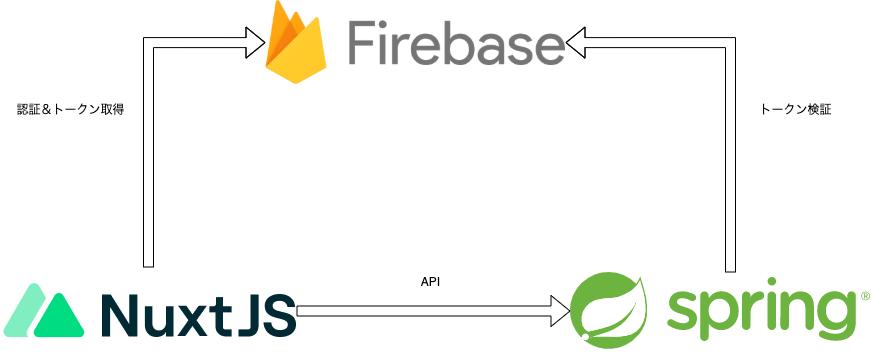
どうも、小野です。今回は、バックエンドがAPIのみ、フロントエンドがSPAの構成におけるOAuth認証とリクエスト時の認証チェックについてです。個人的にSpringBootとNuxtを利用することが多いのですが、この構成でのOAuth認証の実現方法を中々見出せずにいました。SprignBootにはOAuth認証を行う仕組みがSpringSecurityに実装されているのですが、フロントエンドとの連携が複雑化して断念しました。そこで、FirebaseのAuthentizcationサービスを使ってGoogle認証について調査したところ、スマートな方法が発見できたのでご紹介します。
構成
技術スタック
| 項目 | バージョン |
|---|---|
| Java | 17 |
| SpringBoot | 2.16 |
| NuxtJS(CompositionAPI利用) | 2 |
| Node | 16.13.0 |
Firebaseのセットアップ
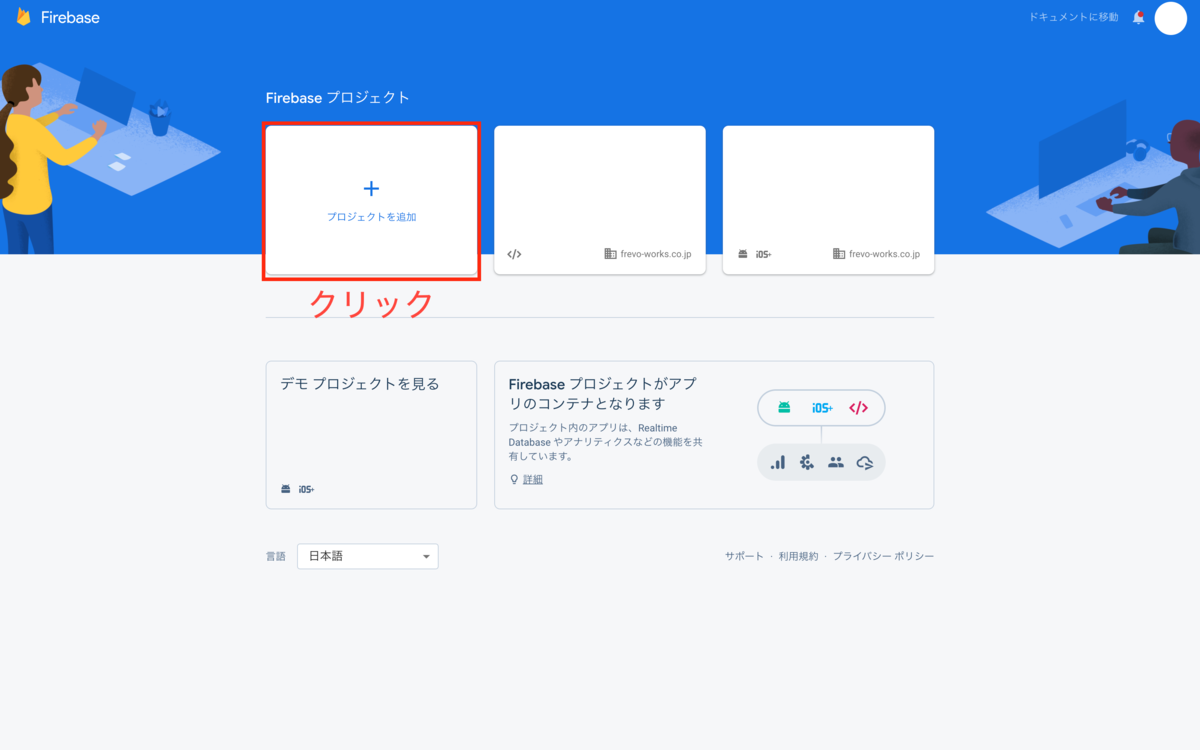
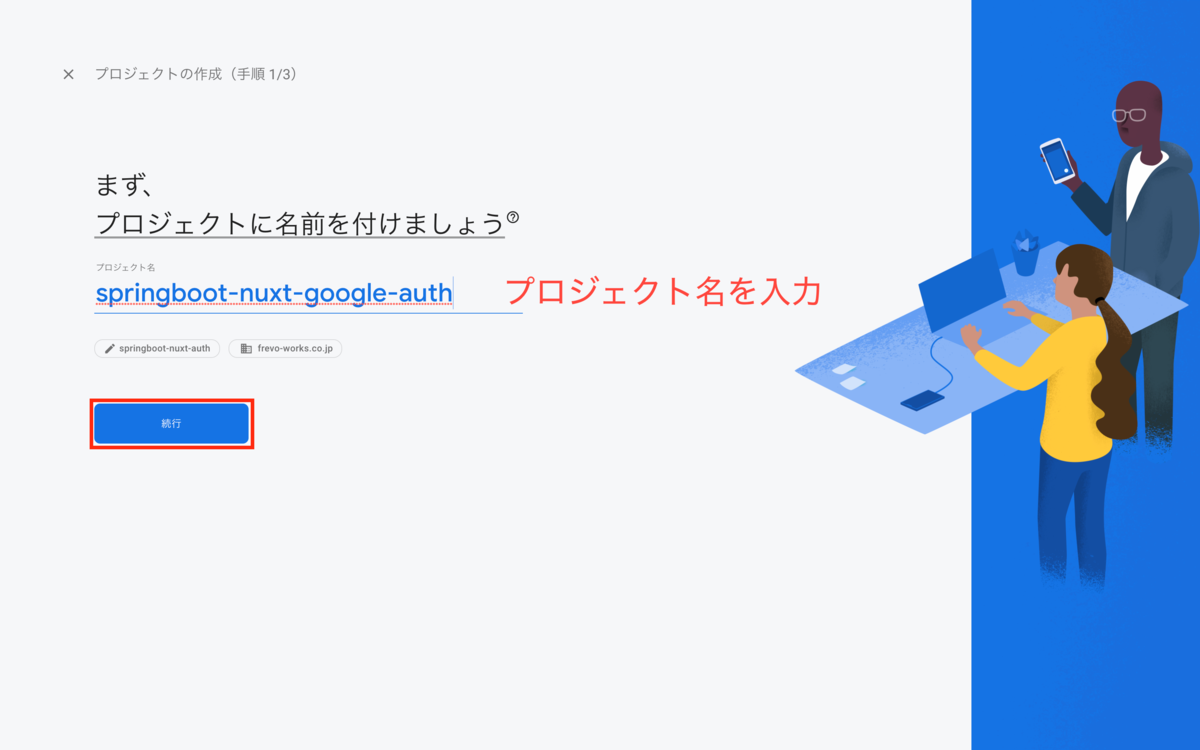
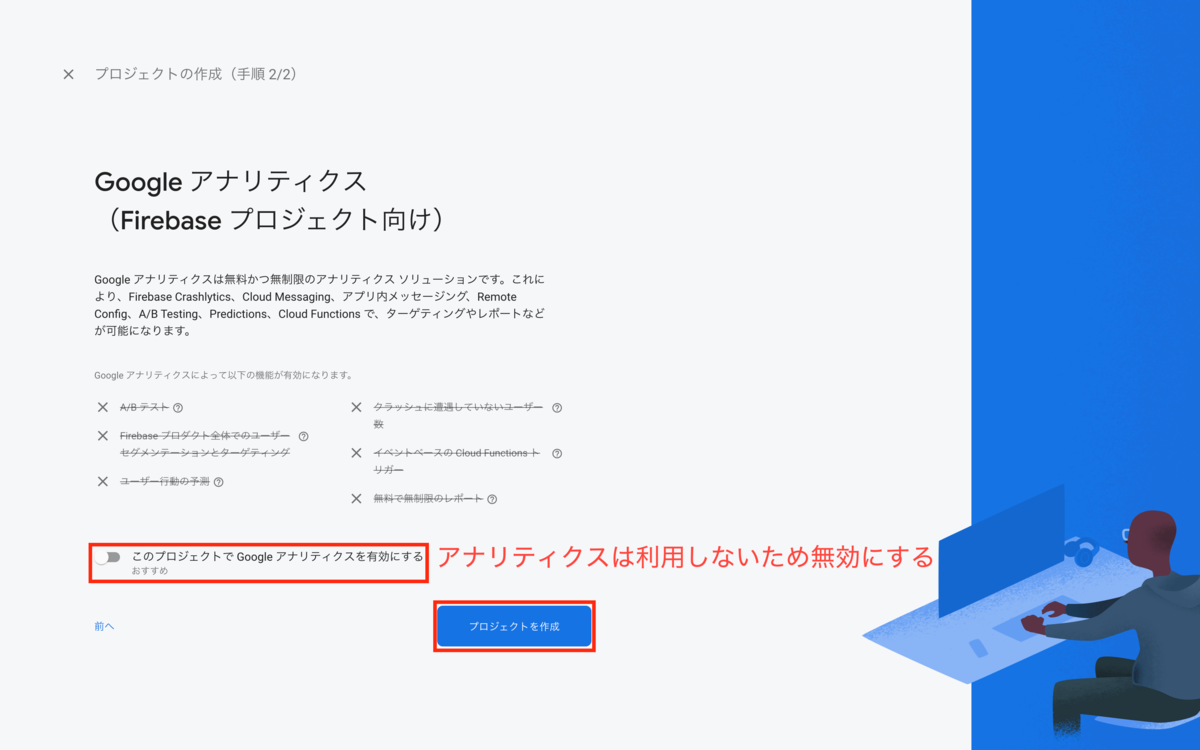
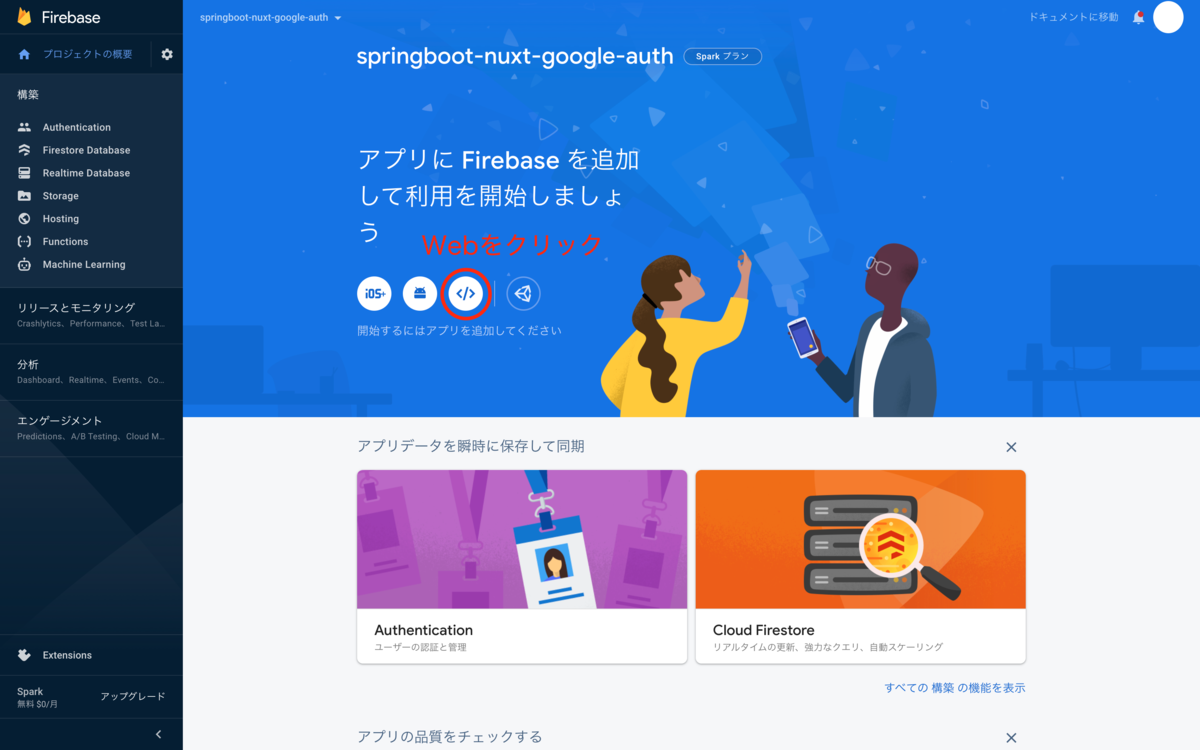
プロジェクト作成
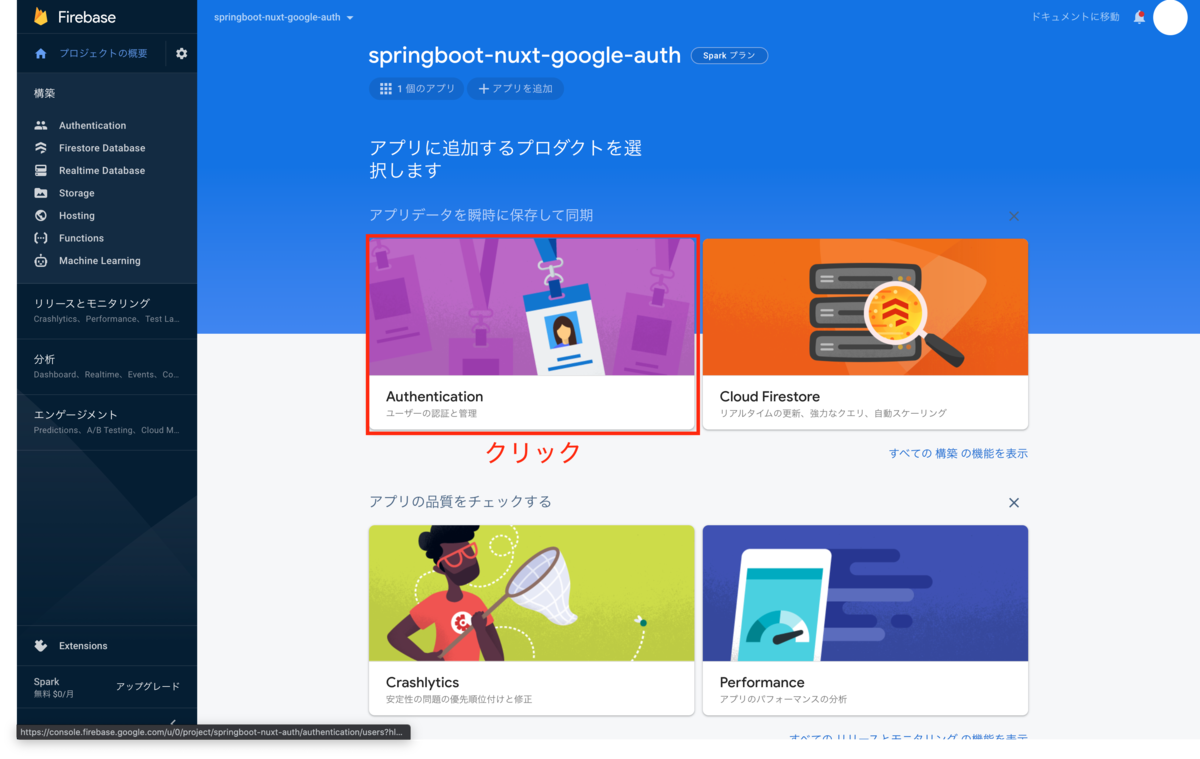
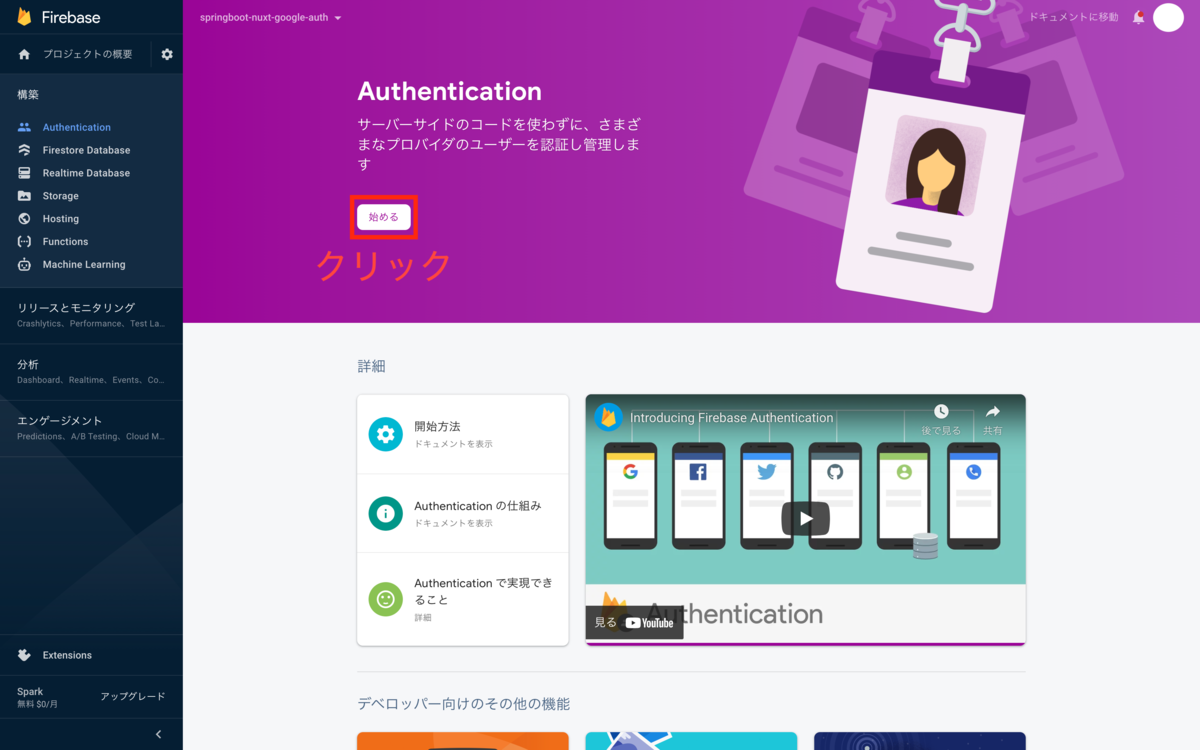
Authentication設定
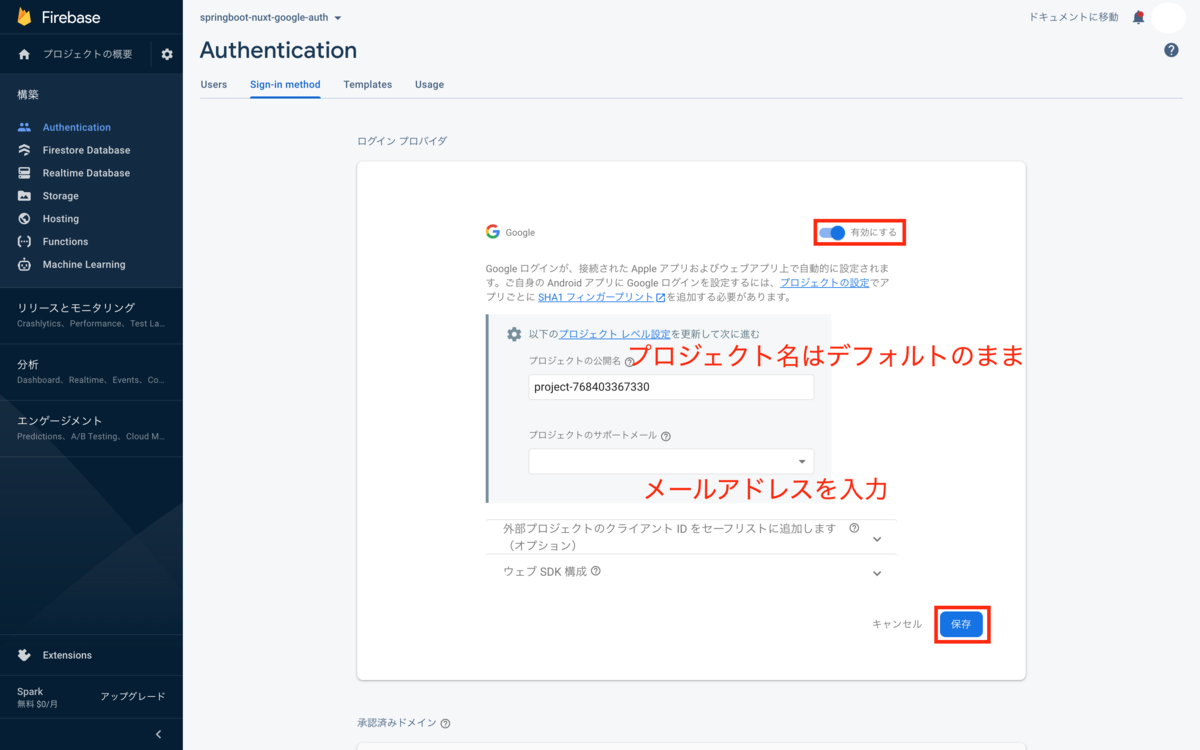
プロバイダの追加

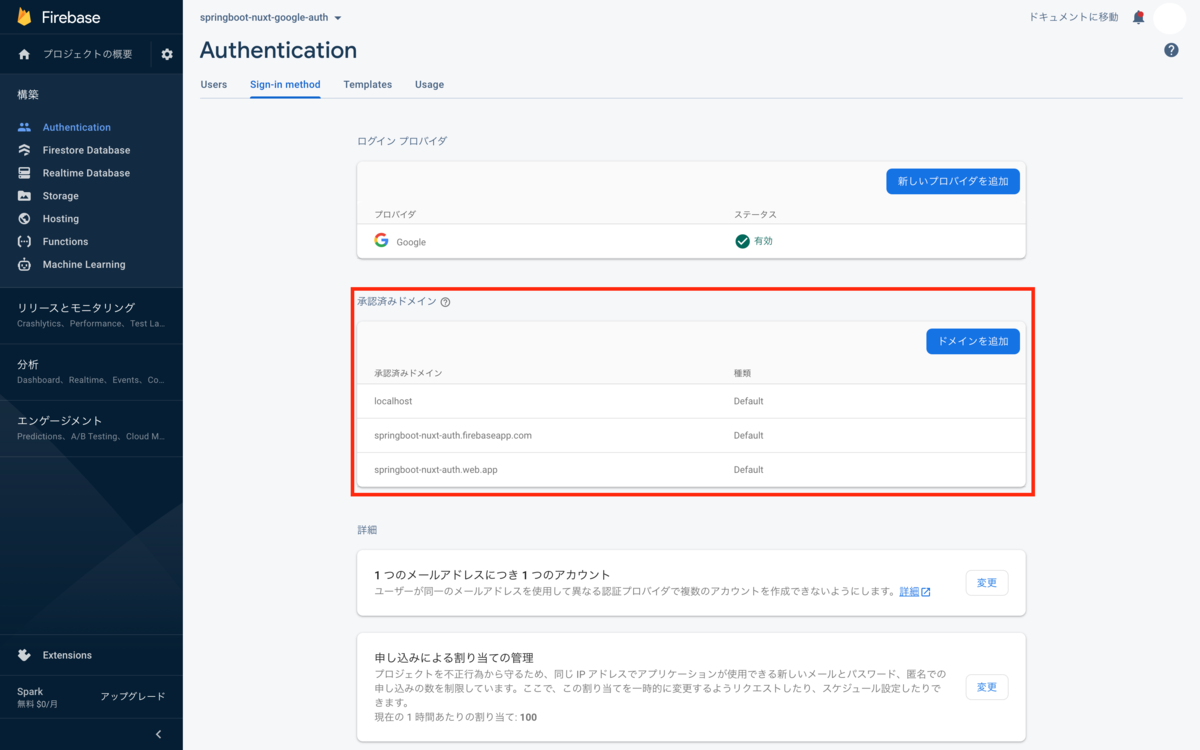
承認済みドメインの追加(任意)
今回はローカルでの確認のみなので、特に作業は必要ありませんが、以下のリストに記載されているドメインからGoogle認証を行う場合は追加が必要になります。
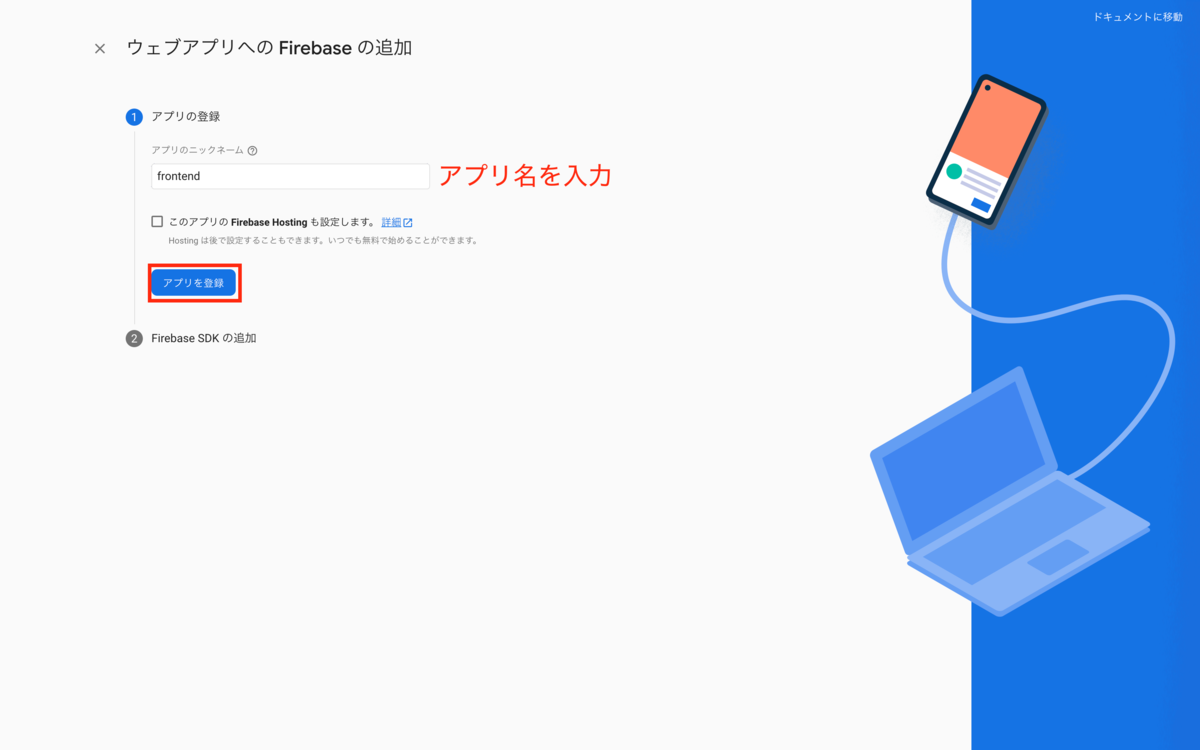
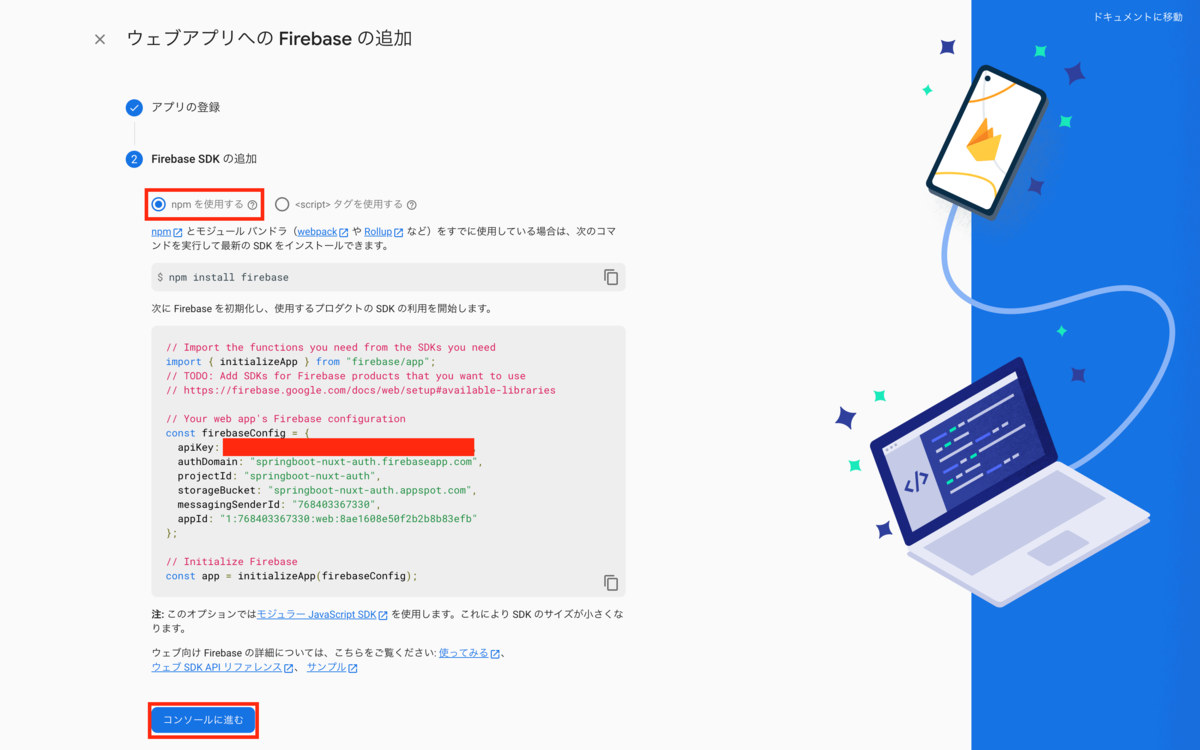
マイアプリ登録
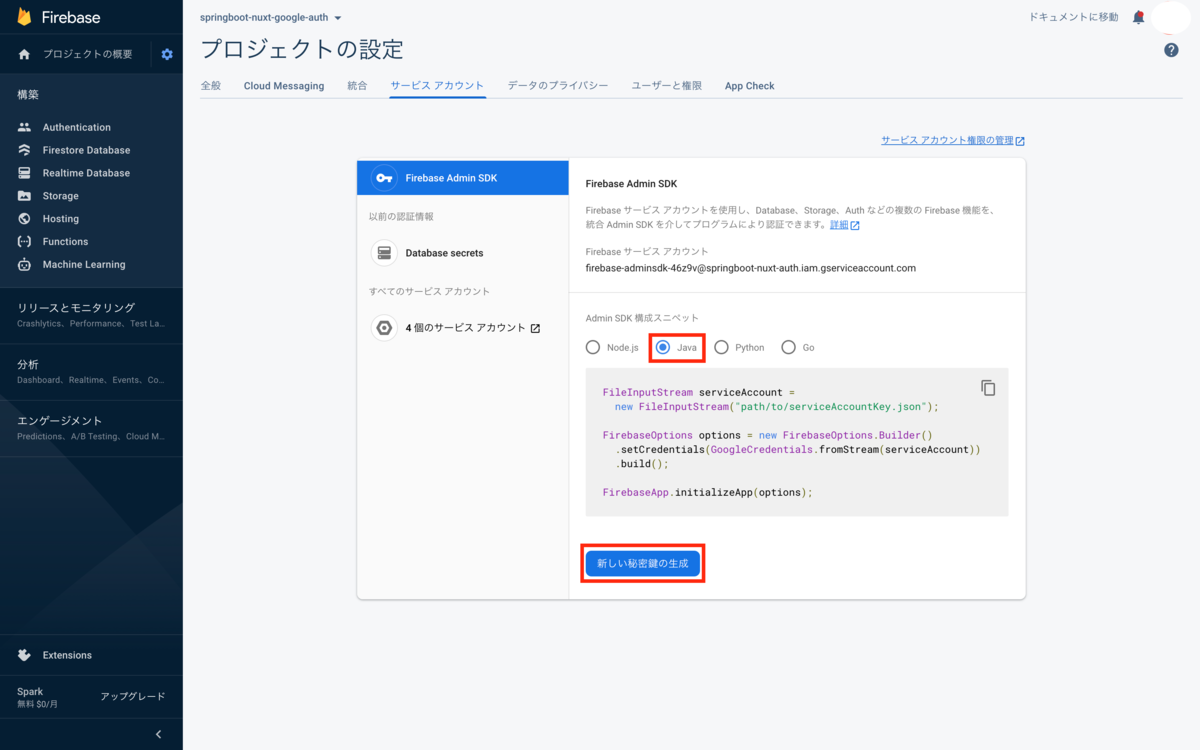
サービスアカウント
バックエンドで利用するFirebase Admin SDK初期化時の認証ファイルをダウンロードします。
フロントエンド
今回は、Nuxt2+CompositionAPIを使って実装していきます。
まず、プロジェクトを作成します。
$ npx create-nuxt-app frontend
Need to install the following packages:
  create-nuxt-app
Ok to proceed? (y) y

create-nuxt-app v3.7.1
✨  Generating Nuxt.js project in frontend
? Project name: frontend
? Programming language: TypeScript
? Package manager: Npm
? UI framework: (Use arrow keys)
? UI framework: None
? Nuxt.js modules: (Press <space> to select, <a> to toggle all, <i> to invert selection)
? Linting tools: (Press <space> to select, <a> to toggle all, <i> to invert selection)
? Testing framework: None
? Rendering mode: Universal (SSR / SSG)
? Deployment target: Static (Static/Jamstack hosting)
? Development tools: (Press <space> to select, <a> to toggle all, <i> to invert selection)
? What is your GitHub username? frevo-works-ono
? Version control system: Git
CompositionAPIを利用するための設定は今回は割愛します。以下のサイトを参考に、セットアップしてください。
Firebaseのセットアップ
依存モジュールをインストールします。
npm i firebase
Firebaseの初期化情報を環境変数から取得するようにします。 .envに下記の内容を記載します。
FIREBASE_API_KEY=<Firebase API Key>
nuxt.config.js
export default {
 // 〜省略〜

  publicRuntimeConfig: {
    firebaseApiKey: process.env.FIREBASE_API_KEY, // 追記
  },
})
Firebaseの機能をラップするプラグインを作成します。
import { initializeApp } from 'firebase/app'
import { getAuth, GoogleAuthProvider, signInWithPopup, User } from 'firebase/auth'
import type { Plugin } from '@nuxt/types'

const firebase: Plugin = ({ $config }, inject) => {

    const firebaseConfig = {
        apiKey: $config.firebaseApiKey,
        authDomain: `xxxxxxxxxx.firebaseapp.com`,
        projectId: xxxxxxxxxx,
        storageBucket: `xxxxxxxxxx.appspot.com`,
        messagingSenderId: xxxxxxxxxxxxx,
        appId: xxxxxxxxxxxxxxxxx,
    }

    // Firebase初期化
    initializeApp(firebaseConfig)

    // ログイン処理
    const login = () => {
        return new Promise<User | false>((resolve, reject) => {
            signInWithPopup(
                getAuth(),
                new GoogleAuthProvider()
            ).then(user => {
                if (user.user) {
                    resolve(user.user)
                } else {
                    resolve(false)
                }
            })
        })
    }

    // ユーザ取得
    const getUser = () => {
        return new Promise<User | false>((resolve, reject) => {
            getAuth().onAuthStateChanged((user) => {
                if (user) {
                    resolve(user)
                } else {
                    resolve(false)
                }
            })
        })
    }

    inject('firebase', { login, getUser })
}

export default firebase
ログインページの作成
pages/signin.vueを作成します。
<template>
  <button type="button" @click="login">Google認証</button>
</template>

<script lang="ts">
import { defineComponent, useContext } from '@nuxtjs/composition-api'
export default defineComponent({
  setup() {
    const { app, $firebase } = useContext()

    const login = async () => {
      const user = await $firebase.login()
      if (!user) {
        // 認証エラー
        return
      }

      app.router?.replace('/')
    }

    return {
      login
    }
  }
})
</script>
ログイン後ページの作成
pages/index.vueを作成します。
<template>
  <div>{{ message }} {{ name }}</div>
</template>

<script lang="ts">
import {
  defineComponent,
  ref,
  useContext,
  useFetch,
} from "@nuxtjs/composition-api";
export default defineComponent({
  setup() {
    const { app, $firebase } = useContext();

    let name = ref("");
    let message = ref("");

    useFetch(async () => {
      // ログイン済みユーザの取得
      const user = await $firebase.getUser();

      if (!user) {
        // 未ログインのため、ログイン画面に遷移
        app.router?.replace("/signin");
        return;
      }

      const token = await user.getIdToken();
      const res = await fetch("http://localhost:8080/api/hello", {
        headers: { Authorization: `Bearer ${token}` },
      });

      if (res.status === 403) {
        app.router?.replace("/signin");
        return;
      }

      name.value = user.displayName!;
      message.value = await res.text();
    });

    return {
      name,
      message,
    };
  },
});
</script>
以上で、フロントエンド側の実装は終わりです。
バックエンド
Spring Initializrでプロジェクトを作成します。
今回利用するライブラリは以下の通り。
<dependency>
    <groupId>org.springframework.boot</groupId>
    <artifactId>spring-boot-starter-security</artifactId>
</dependency>

<dependency>
    <groupId>org.springframework.boot</groupId>
    <artifactId>spring-boot-starter-web</artifactId>
</dependency>

<dependency>
    <groupId>org.springframework.boot</groupId>
    <artifactId>spring-boot-devtools</artifactId>
    <scope>runtime</scope>
    <optional>true</optional>
</dependency>

<dependency>
    <groupId>org.projectlombok</groupId>
    <artifactId>lombok</artifactId>
    <optional>true</optional>
</dependency>
他にクライアントでGoogle認証で発行されたトークンを検証するために、Firebase Admin SDKを追加します。
<dependency>
    <groupId>com.google.firebase</groupId>
    <artifactId>firebase-admin</artifactId>
    <version>8.1.0</version>
</dependency>
Firebase Admin SDKを利用するには、最初に初期化処理が必要になります。 初期化処理には、Firebaseのサービスアカウントでダウンロードした秘密鍵(jsonファイル)を利用する必要があるのですが、Githubなどにはアップするべきではありません。でも、デプロイの際には必要になります。では、どうするか。以下のコードのように、各値を環境変数から取得するようにし、jsonファイルを作成すればいいのです。
@Component
public class FirebaseAuthClient {

    private static final String FIREBASE_CREDENTIALS_PATH = "credential.json";

    public FirebaseAuthClient() {

        try {
            FileWriter fw = new FileWriter(FIREBASE_CREDENTIALS_PATH);
            try (PrintWriter pw = new PrintWriter(new BufferedWriter(fw))) {

                // 環境変数から取得して設定する
                Map<String, String> credentials = new HashMap<>();
                credentials.put("type", "service_account");
                credentials.put("project_id", System.getenv("FIREBASE_PROJECT_ID"));
                credentials.put("private_key_id", System.getenv("FIREBASE_PRIVATE_KEY_ID"));
                credentials.put("private_key", System.getenv("FIREBASE_PRIVATE_KEY"));
                credentials.put("client_email", System.getenv("FIREBASE_CLIENT_EMAIL"));
                credentials.put("client_id", System.getenv("FIREBASE_CLIENT_ID"));
                credentials.put("auth_uri", "https://accounts.google.com/o/oauth2/auth");
                credentials.put("token_uri", "https://oauth2.googleapis.com/token");
                credentials.put("auth_provider_x509_cert_url", "https://www.googleapis.com/oauth2/v1/certs");
                credentials.put("client_x509_cert_url",
                        "https://www.googleapis.com/robot/v1/metadata/x509/" + System.getenv("FIREBASE_CLIENT_EMAIL"));

                // MapをJson形式の文字列に変換
                String str = new ObjectMapper().writeValueAsString(credentials);

                // ファイルに書き込み
                pw.println(str);
            }

            FileInputStream serviceAccount = new FileInputStream(FIREBASE_CREDENTIALS_PATH);

            FirebaseOptions options = FirebaseOptions.builder()
                    .setCredentials(GoogleCredentials.fromStream(serviceAccount)).build();

            // 初期化
            FirebaseApp.initializeApp(options);

        } catch (IOException e) {
            throw new RuntimeException(e);
        }
    }

    public FirebaseToken verify(String token) throws FirebaseAuthException {
        return FirebaseAuth.getInstance().verifyIdToken(token);
    }

    @PreDestroy
    public void destroy() {
        FirebaseApp.getInstance().delete();
    }
}
トークンを取得するフィルターの作成
クライアントからはAuthorizationヘッダのBearerトークンで渡されるので、そこからトークンを取得します。
public class AuthFilter extends AbstractPreAuthenticatedProcessingFilter {

    private static final String TOKEN_PREFIX = "Bearer ";

    @Override
    protected Object getPreAuthenticatedPrincipal(HttpServletRequest request) {
        return "";
    }

    @Override
    protected Object getPreAuthenticatedCredentials(HttpServletRequest request) {
        final var token = request.getHeader(HttpHeaders.AUTHORIZATION);


        if (Objects.isNull(token) || !token.startsWith(TOKEN_PREFIX)) {
            // 先頭が「Bearer 」で開始されていない場合
            return "";
        }

        // 「Bearer 」以降の文字列を返却
        return token.substring(TOKEN_PREFIX.length());
    }

}
トークンの検証を行うサービスの作成
public class AuthService implements AuthenticationUserDetailsService<PreAuthenticatedAuthenticationToken> {

    private FirebaseAuthClient firebaseAuthClient;
    private UserRepository userRepository;

    public AuthService(FirebaseAuthClient firebaseAuthClient, UserRepository userRepository) {
        this.firebaseAuthClient = firebaseAuthClient;
        this.userRepository = userRepository;
    }

    @Override
    public UserDetails loadUserDetails(PreAuthenticatedAuthenticationToken token) throws UsernameNotFoundException {

        // AuthFilterから渡されたトークンを取得
        final var credential = token.getCredentials().toString();

        // 空の場合は認証エラーとする
        if (credential.isEmpty()) {
            throw new BadCredentialsException("トークンが空です");
        }

        try {

            // トークンの検証
            FirebaseToken firebaseToken = firebaseAuthClient.verify(credential);

            return userRepository.findByEmail(firebaseToken.getEmail())
                    .map(user -> new User(user.getEmail(), "",
                            AuthorityUtils.createAuthorityList(user.getRole())))
                    .orElseThrow(() -> new UsernameNotFoundException("該当するユーザが存在しません"));

        } catch (FirebaseException e) {
            throw new BadCredentialsException("トークンの検証エラー",e);
        }
    }

}
SpringSecurityの設定
@EnableWebSecurity
public class SecurityConfig extends WebSecurityConfigurerAdapter {

    private UserRepository userRepository;
    private FirebaseAuthClient firebaseAuthClient;

    public SecurityConfig(UserRepository userRepository, FirebaseAuthClient firebaseAuthClient) {
        this.userRepository = userRepository;
        this.firebaseAuthClient = firebaseAuthClient;
    }

    @Override
    protected void configure(HttpSecurity http) throws Exception {
        http.authorizeRequests()
                .anyRequest()
                .authenticated();

        http.addFilter(preAuthenticatedProcessingFilter());

        // CSRF無効
        http.csrf().disable();

        // CORS対応(フロントエンドとオリジンが異なるため必要)
        http.cors().configurationSource(getCorsConfigurationSource());

        // セッション管理無効
        http.sessionManagement().sessionCreationPolicy(SessionCreationPolicy.STATELESS);
    }

    private CorsConfigurationSource getCorsConfigurationSource() {
        var corsConfiguration = new CorsConfiguration();

        // 全てのメソッドを許可
        corsConfiguration.addAllowedMethod(CorsConfiguration.ALL);

        // 全てのヘッダを許可
        corsConfiguration.addAllowedHeader(CorsConfiguration.ALL);

        // localhost:3002のみ許可
        corsConfiguration.addAllowedOrigin("http://localhost:3002");

        corsConfiguration.setAllowCredentials(true);

        UrlBasedCorsConfigurationSource corsSource = new UrlBasedCorsConfigurationSource();

        corsSource.registerCorsConfiguration("/**", corsConfiguration);

        return corsSource;
    }

    // フィルター登録
    @Bean
    public PreAuthenticatedAuthenticationProvider preAuthenticatedAuthenticationProvider() {

        var preAuthenticatedAuthenticationProvider = new PreAuthenticatedAuthenticationProvider();

        preAuthenticatedAuthenticationProvider
                .setPreAuthenticatedUserDetailsService(new AuthService(firebaseAuthClient, userRepository));

        preAuthenticatedAuthenticationProvider.setUserDetailsChecker(new AccountStatusUserDetailsChecker());

        return preAuthenticatedAuthenticationProvider;
    }

    // 作成したフィルター
    private AbstractPreAuthenticatedProcessingFilter preAuthenticatedProcessingFilter() throws Exception {

        var preAuthenticatedProcessingFilter = new AuthFilter();
        preAuthenticatedProcessingFilter.setAuthenticationManager(authenticationManager());

        return preAuthenticatedProcessingFilter;
    }
API作成
サンプルのAPIを作成します。
@RestController
@RequestMapping("api/hello")
public class HelloController {
    @GetMapping
    public String hello() {
        return "Hello";
    }
}
動作確認
フロントエンド、バックエンドそれぞれ起動します。
起動したら、http://localhost:3000にアクセスします。(ポートはデフォルトを利用しています)
未認証なため、以下のようなログイン画面に遷移されます。
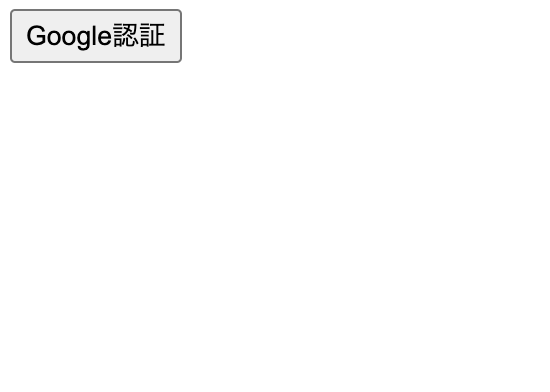
Google認証ボタンをクリックし、毎度おなじみのOAuth認証を行います。
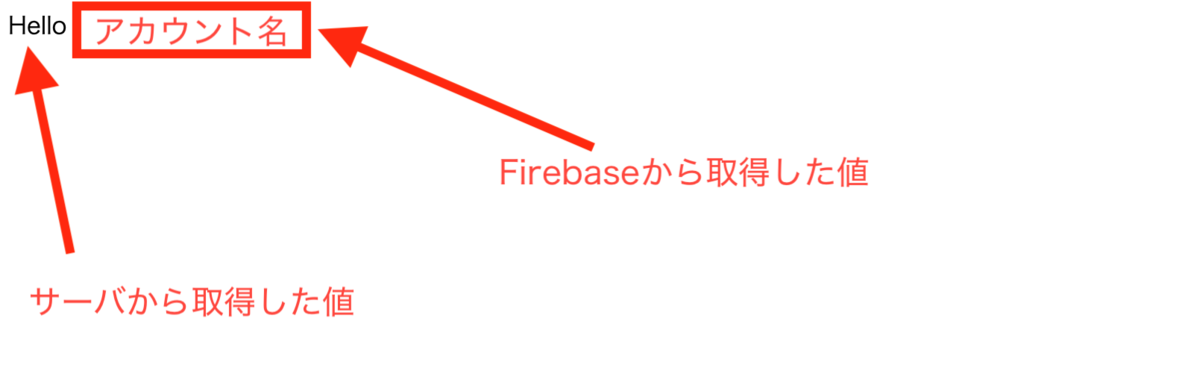
認証に成功すると、画面に「Hello <認証したGoogleアカウント名>」が表示されます。
おわりに
OAuthにFirebaseなどの認証サービスを利用することで、比較的簡単に認証処理を実現できました。 OAuthのサービスプロバイダごとに認証APIが変わることがありますが、Firebaseなどを利用することでAPI変更など意識しなくて済むので、よりビジネスロジックの実装に集中できると思います。今回はFirebaseを利用しましたが、他にAuth0やAmazon Cognitoなどのサービスがあるので、興味がある方はぜひ使ってみてください。
今回利用したソースはGithubにあげたので参考にしてみてください。